Anteriad Marketing Cloud AMC 2023.3.0 Release Notes
Version: AMC 2023.3.0
The New Anteriad Marketing Cloud
The New Anteriad Marketing Cloud
The existing True Influence Marketing Cloud (TIMC) and Unifi features are now Integrated into this new Anteriad Marketing Cloud platform (AMC) in order to migrate all TIMC and 180byTwo customers to the same platform. The integrated feature sets from the two platforms provide customers with a more feature-rich experience allowing audiences to be activated across the combined set of channels currently available through TIMC and Unifi.
New Changes
New Changes
Below are changes made to the TIMC platform as a result of its integration with Unifi
1. Region and Site Level Lists
1. Region and Site Level Lists
In addition to Domain and Contact lists, Region and Site level lists are now accepted in Marketing Cloud for processing and for Audience creation. These lists can also be enhanced like other list types.
1.1 To upload and Process Region and Site Level lists
1.1 To upload and Process Region and Site Level lists
- Login to Marketing Cloud
- Go to Lists > List Upload
- Select either Region or Site level list types from the sidebar
- Click/drag a list to the right hand area to upload a list
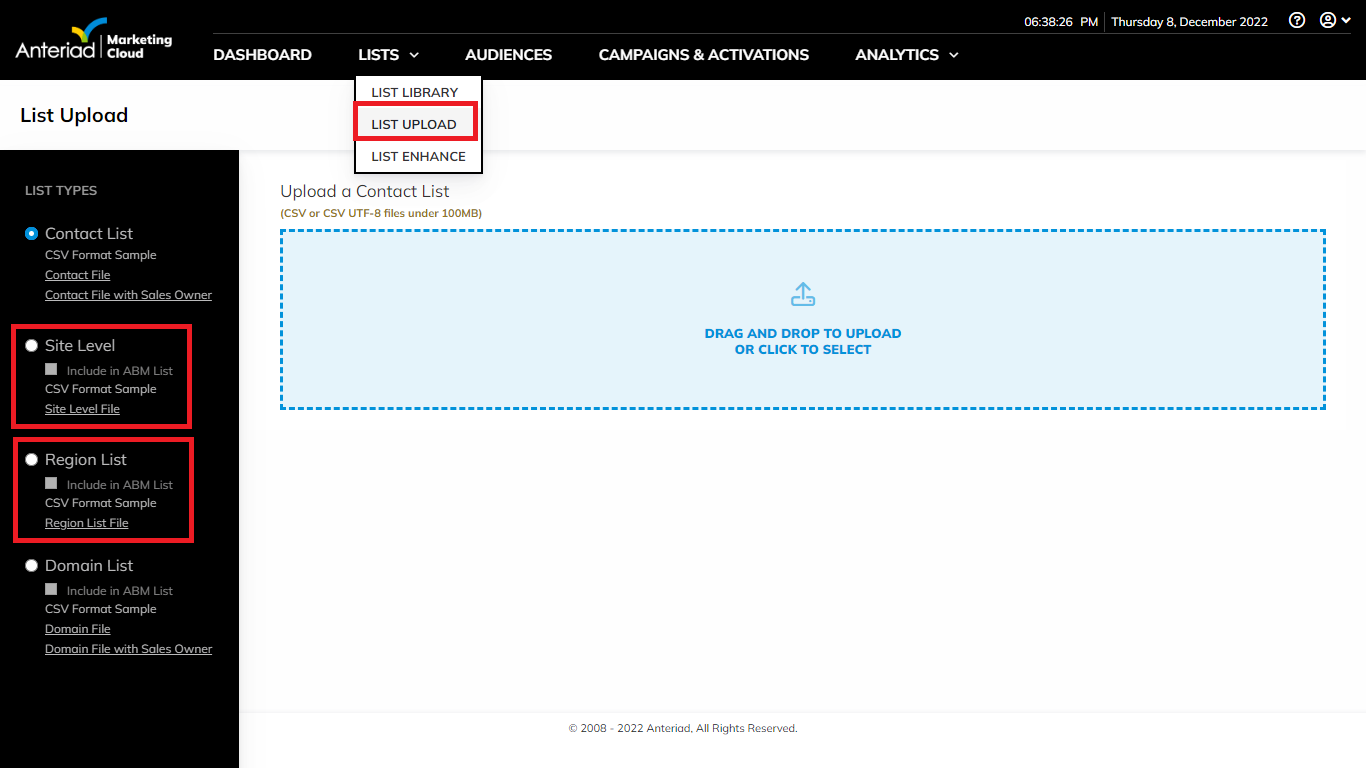
- Click on the sample file of any of the list types on the sidebar to download the list sample/template for your list guide
- Site Level list type must follow the below specifications:
*CSV format
- 100MB or less
- Follow 180byTwo's AccountLink format
- Include all headers:
company_name, street_address, suite_building_floor, city, state, zip5 - The following columns must contain values:
Company_name, street_address and zip5
- Region list type must follow the below criteria:
- CSV format
- 100MB or less
- Follow 180byTwo's AccountLink format
- Include all headers:
company_name, street_address, suite_building_floor, city, state, zip5 - The following columns must contain values
company, name, and zip5
8 Select the Add to ABM List checkbox below the Site List/Region lists option on the sidebar to include the list in your ABM list
1.2 To Enhance Site Level/Region Lists:
1.2 To Enhance Site Level/Region Lists:
This feature allows you to refine and add more data to your domain or company lists in order to maximize your campaign. Follow the below steps to enhance your list:
- Login into Marketing Cloud
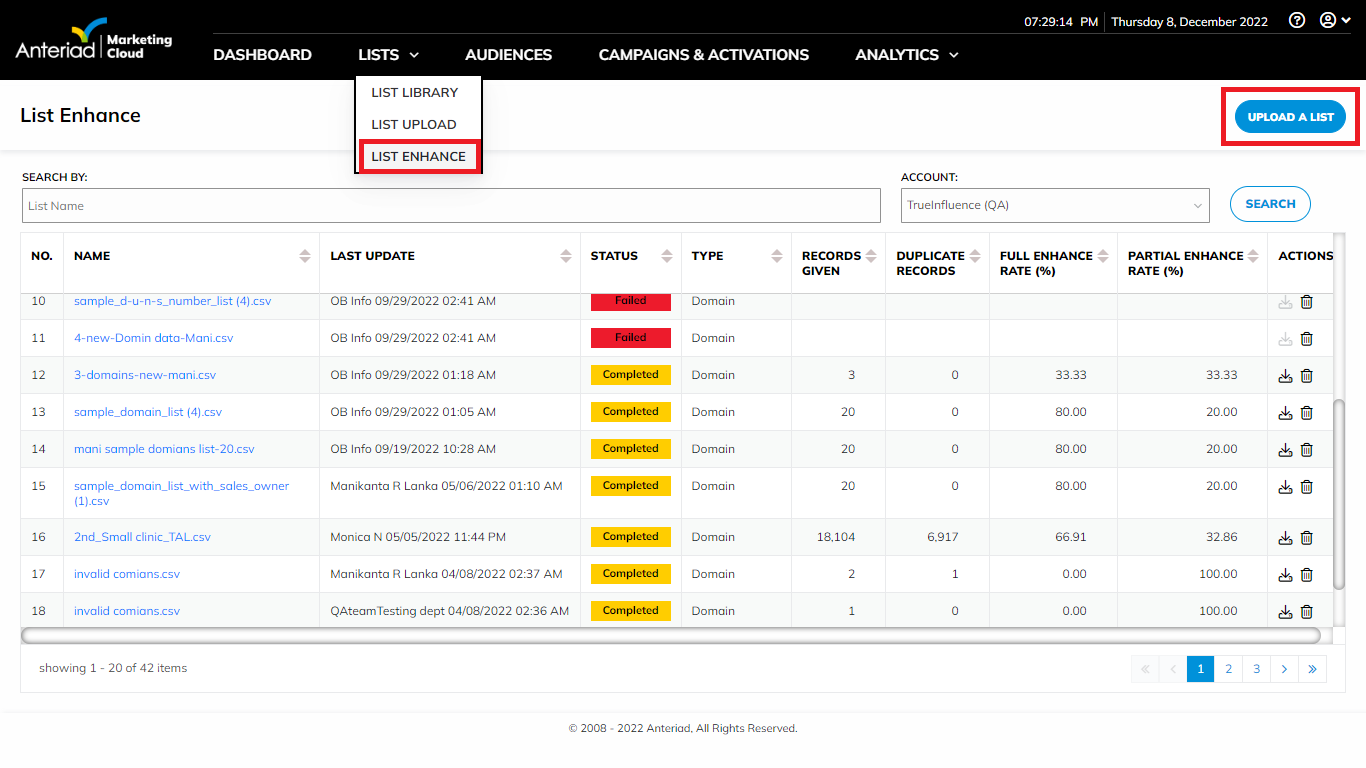
- Go to Lists > List Enhance
- Click on the Upload a list Buton,
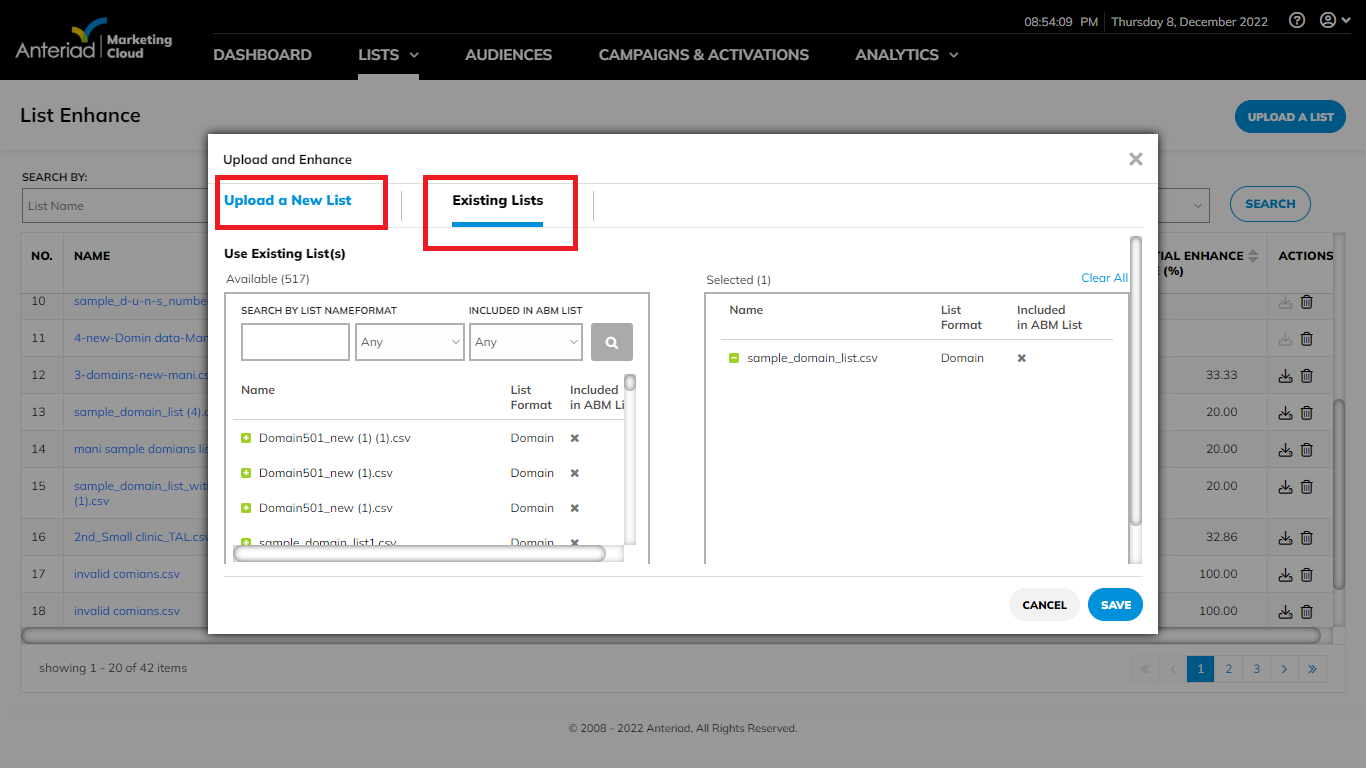
- Upload your Site Level/Region list OR
- Select from existing lists
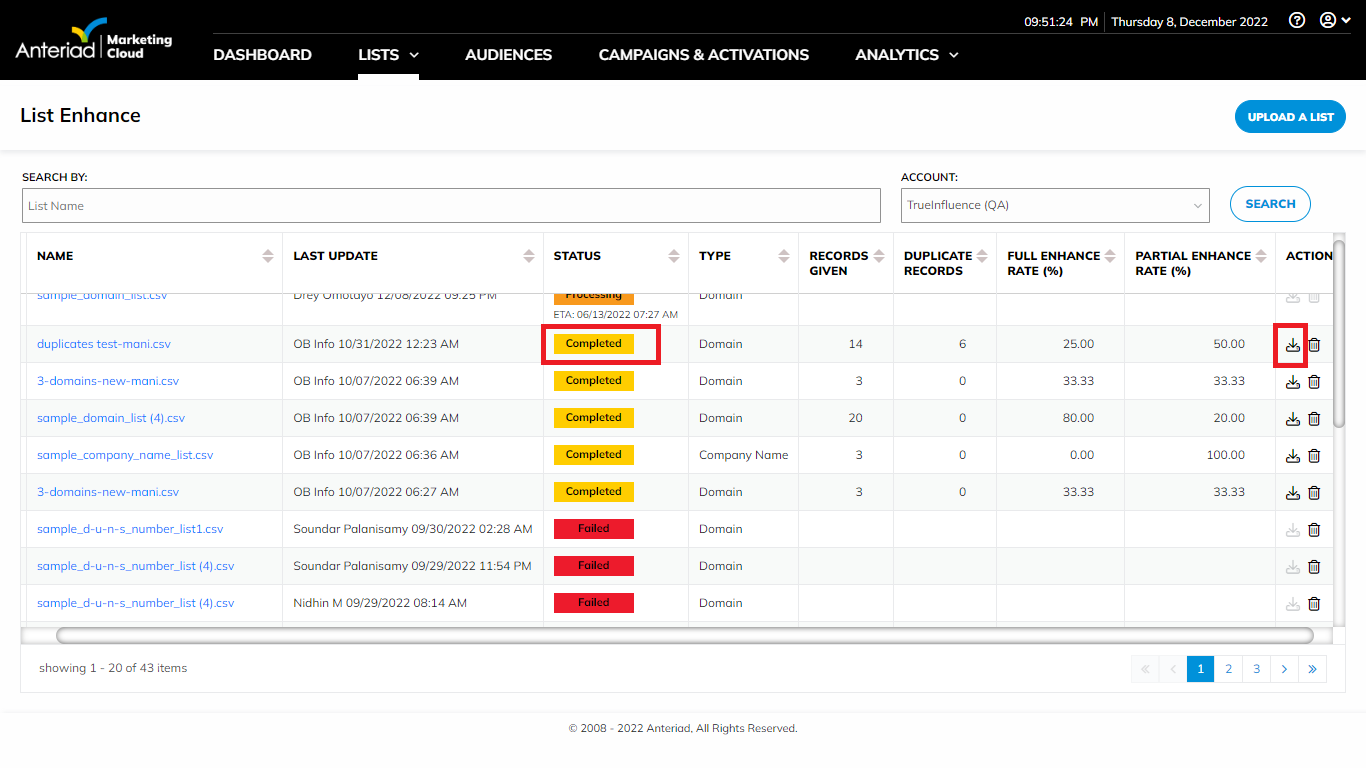
- Enhance and download when the Status shows as Completed
2. Audience Builder
2. Audience Builder
Audiences can now be built using criteria previously available in both the Marketing Cloud and Unifi platforms. Updates to the Audience Builder include:
- Updated User Interface
- Ability to Exclude records based on any available criteria
- Removal of List upload feature
- Addition of Intent Level options
- Removal of DUNS list from the List Library
- Addition of Hubspot Integration
- Addition of Location Type criteria
2.1 The New Audience Builder UI:
2.1 The New Audience Builder UI:
- Log in to Marketing Cloud
- Click on Audiences > Build An Audience
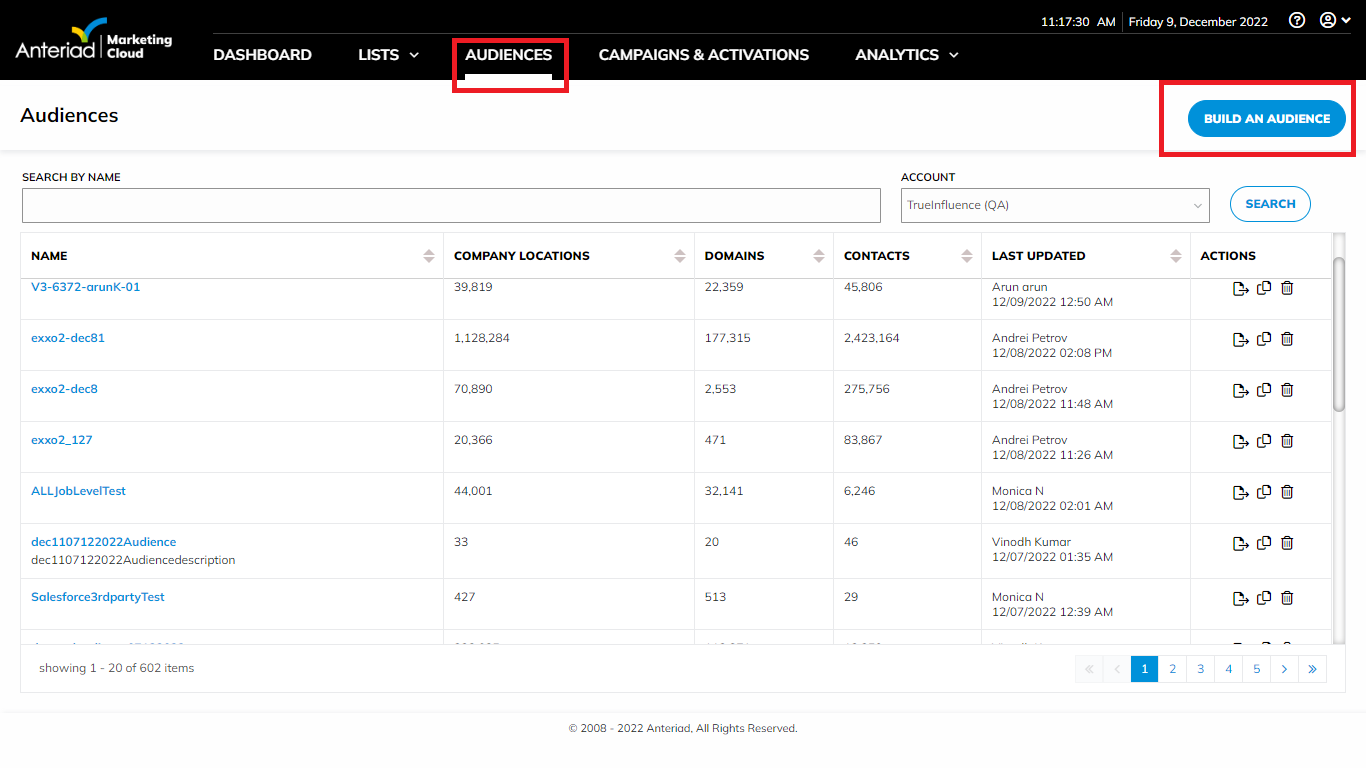
- Select the criteria category from the left to Include or Exclude from the Audience
i. The Include option is selected by default and has the blue color when active or selected
ii. Selected criteria are displayed on the right-hand side under the selected section (Include or Exclude) - Selection of any criteria opens a modal window for your selection. Under the modal is the Add To option where you can switch to either Include or Exclude the selected criteria.
- Click on the Save button to save your selection
- Click on the Preview Audience button to preview your audience when done with your criteria selection
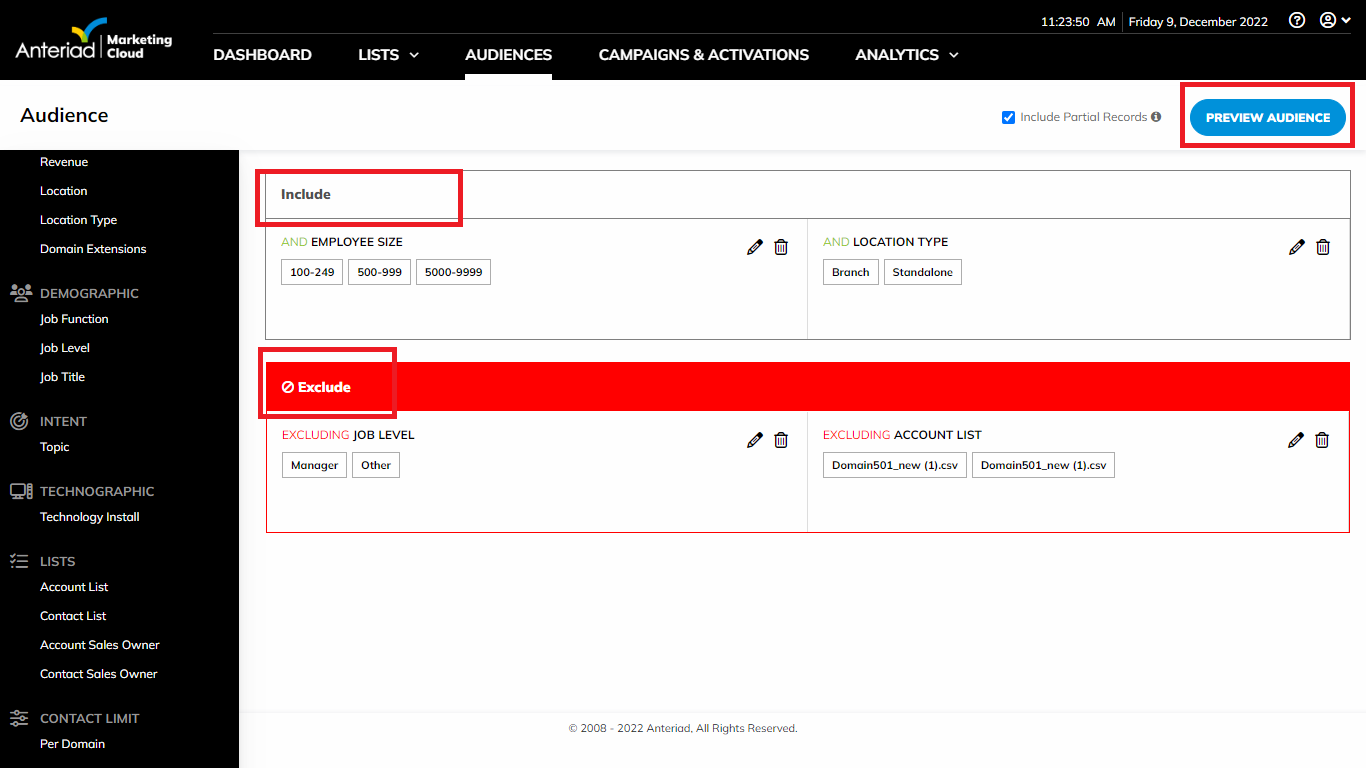
- Click to Edit or Save Audience from the Preview page
Note: While building the Audience, selected criteria are updated so you can see all criteria included and excluded while building an audience.
2.2 To Exclude any Criteria in Marketing Cloud:
2.2 To Exclude any Criteria in Marketing Cloud:
- Click on the Exclude header
i. When selected, the Exclude header background color changes from white to red - Select any criteria on the left to exclude and save
- Use the delete icon to remove any item you no longer want to exclude
- Any criteria can be excluded in the new Marketing Cloud Audience Builder
2.3 Hubspot Lists in Marketing Cloud:
2.3 Hubspot Lists in Marketing Cloud:
- First integrate your Hubspot Marketing to Marketing Cloud using the guide Here
- Then in Audience builder, select Hubspot Marketing Contact List from the criteria categories on the left
- Select desired list(s) if already imported OR
- Click on Import Hubspot Marketing Contacts button to display all your Hubspot lists
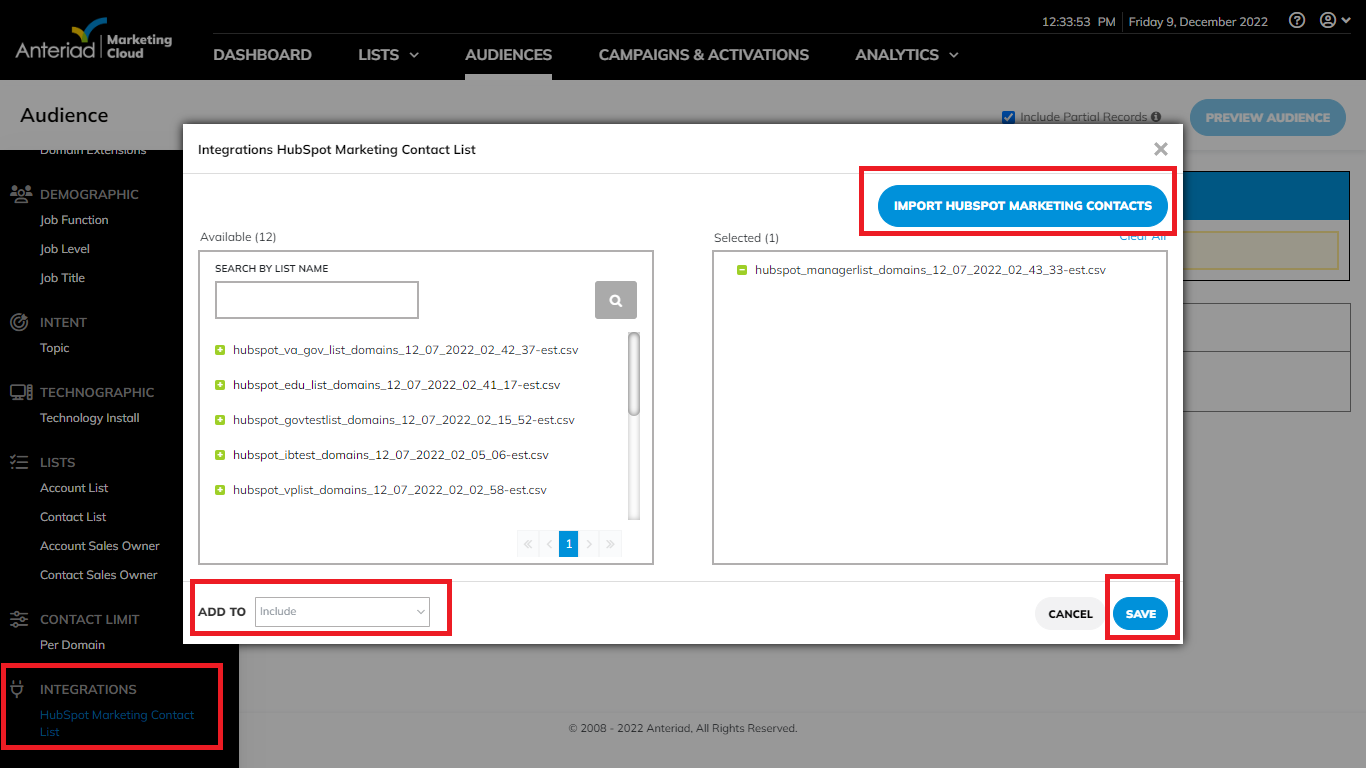
- Select and Import the desired list(s) from your Hubspot Contact lists
- Save your selection
2.4 Removal of List upload feature
2.4 Removal of List upload feature
You can no longer upload lists from the Audience Builder in Marketing Cloud. This is to allow lists uploaded in Lists > List Upload time to process and be ready for you to use when creating your Audience
2.5 Addition of Location Type criteria:
2.5 Addition of Location Type criteria:
You can now select the location types you want to target from the Audience builder when building your audience.
To select location type in Audience Builder;
- Click on Firmographic
- Click on Location type:
- Select desired location type
i. Location types to choose from are:
a. Headquarters
b. Branch
c. Standalone
d. Member of a Partnership
e. Franchise - Click the Select All link to select all available location types criteria
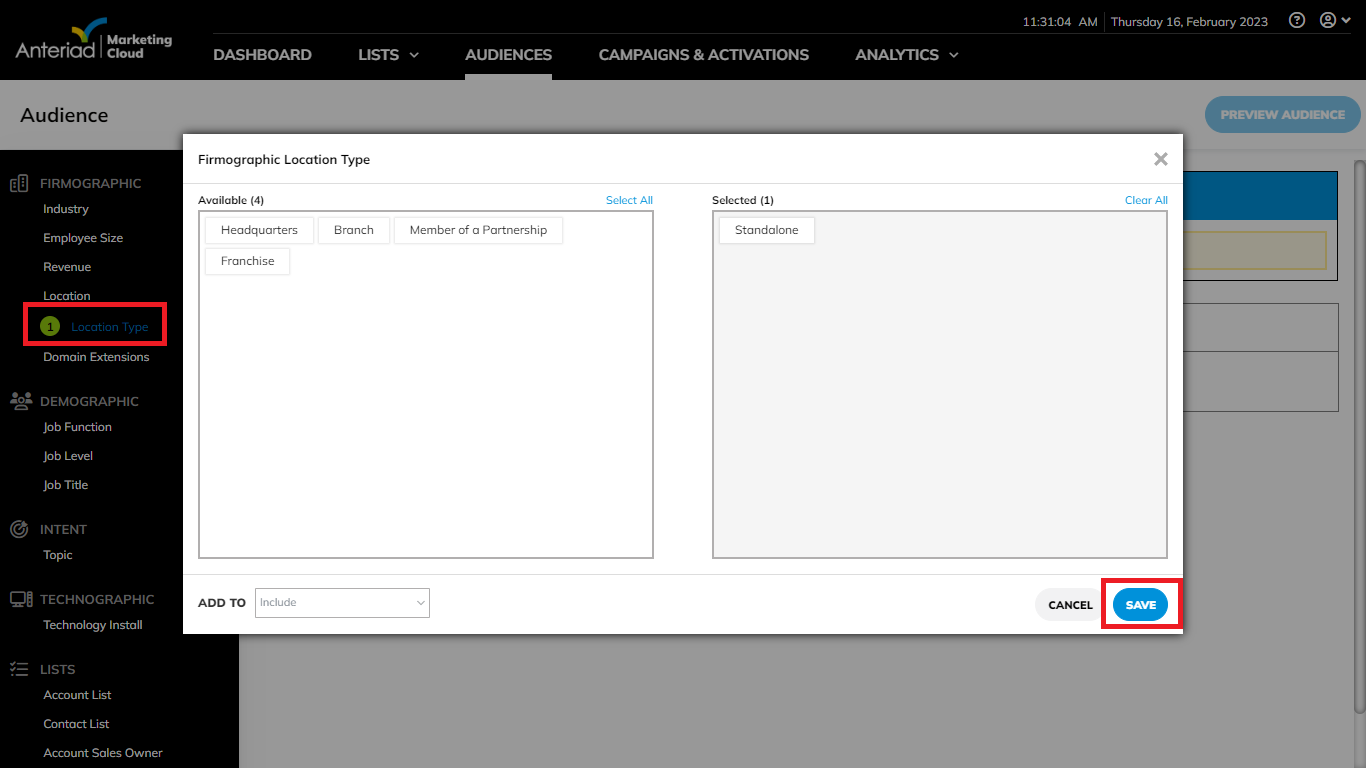
- Click on the Save button to save your selection and close the modal pop-up
2.6 Addition of Intent Level In Audience Builder:
2.6 Addition of Intent Level In Audience Builder:
You can now select topic intent level when building an audience.
- In Audience Builder, go to Intent > Topic
- Enter Intent Topic(s) in the search box
- Click Search to search
- Select Topics or Related topics to Include/Exclude
i. Topics selected appear on the selected topic section - Select the intent level desired per the selected topic
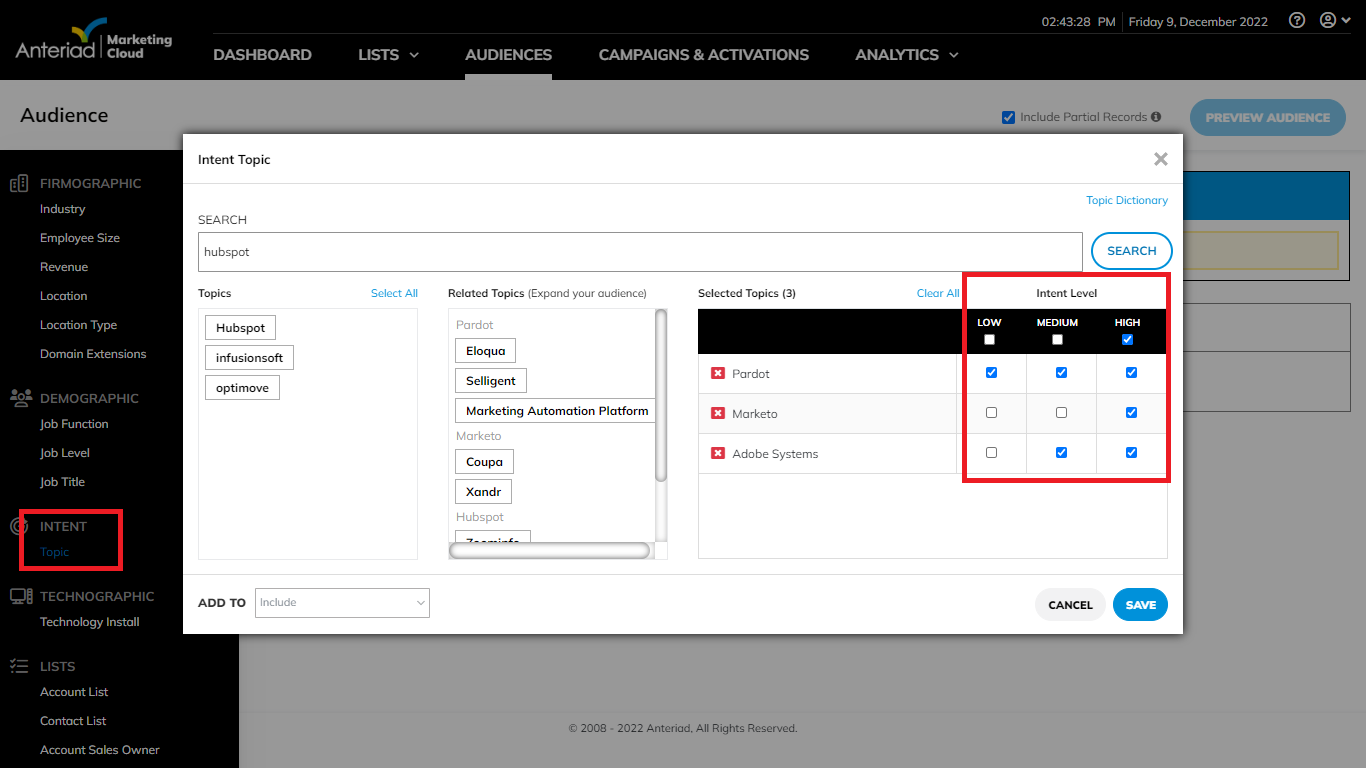
- Intent Level can be Low, Medium, or High
a. Multiple intent levels can be selected per topic
b. Results of the deliveries from Audiences and Campaigns will also reflect the intent level options selected here
3. Audience Preview
3. Audience Preview
Audience counts are now grouped into Offline and Online Sources in Audience Preview.
The Total Available Market chart was also redesigned and renamed to Total Addressable Universe and Exclusions values were applied to chart results (Counts)
3.1 To preview Audience:
3.1 To preview Audience:
- Login to Marketing Cloud
- Click on Audiences > Build An Audience button > Select preferred Audience Criteria OR
- Click on an existing Audience in Audiences page
- Click on the Preview Audience button to preview the audience
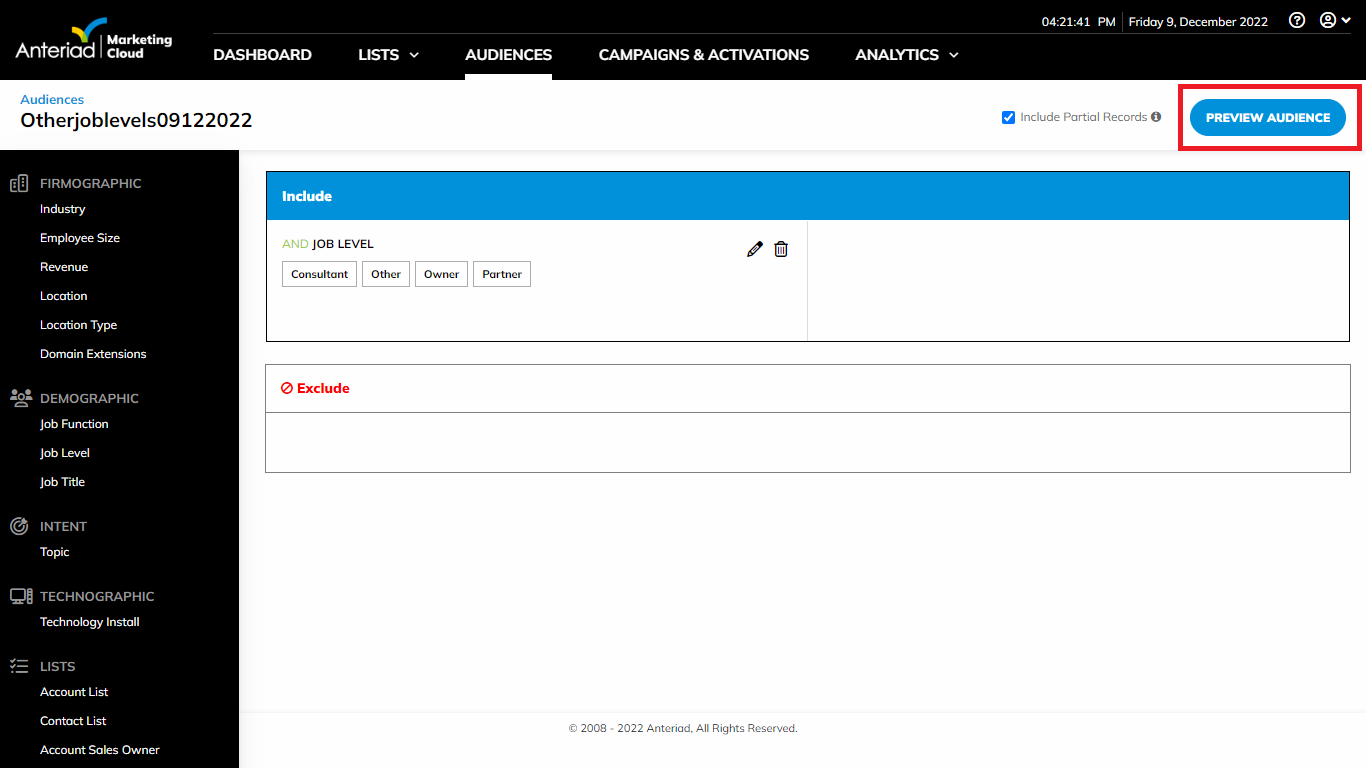
- Select either Offline or Online sources to view their respective counts
i. The Audience data count is broken down into Offline and Online Sources
ii. Offline Sources tab displays a breakdown of 100 records each for the Companies, Domain, and Contacts tabs
iii. Online Sources tab displays the programmatic counts such as IP Address, Cookies, Maids, Ramp ID, etc.
6. Within the Offline Source,
i. Select the Total Addressable icon to preview the addressable audience data breakdown
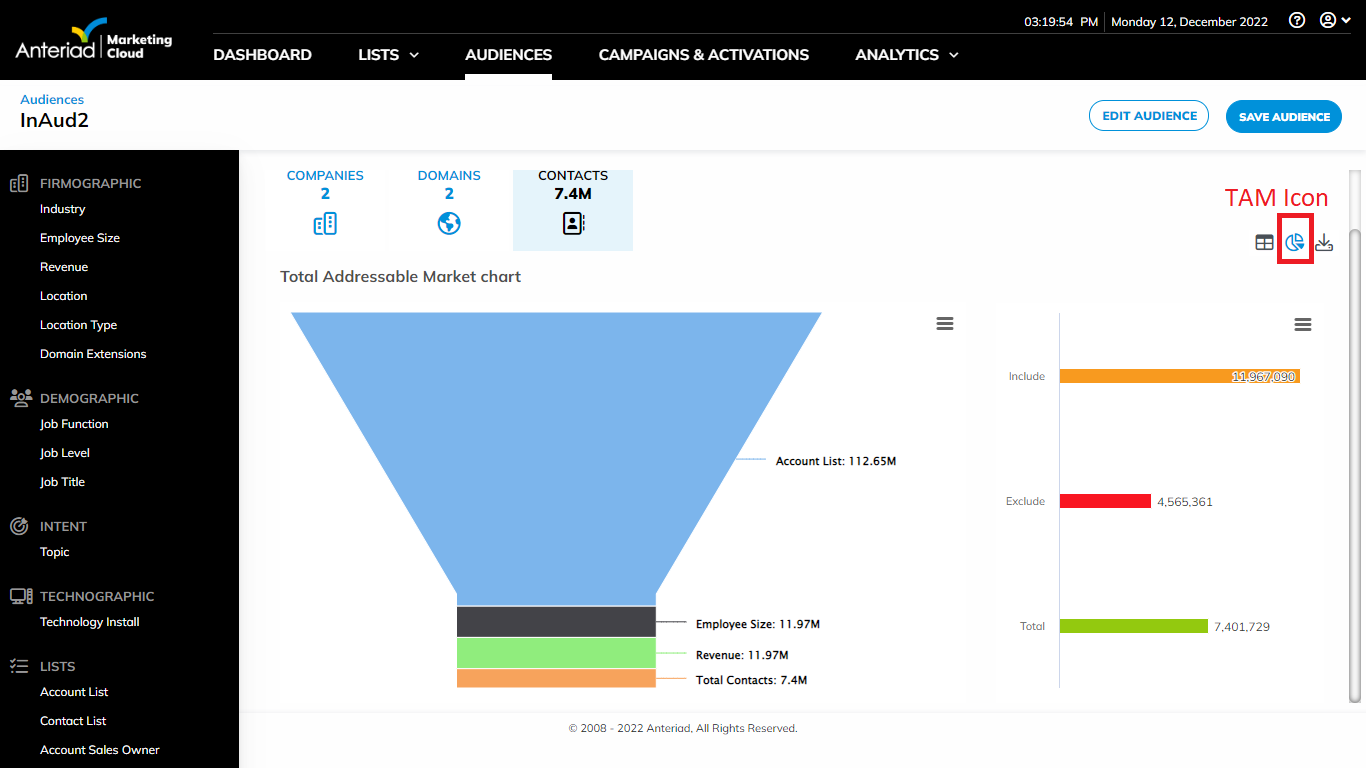
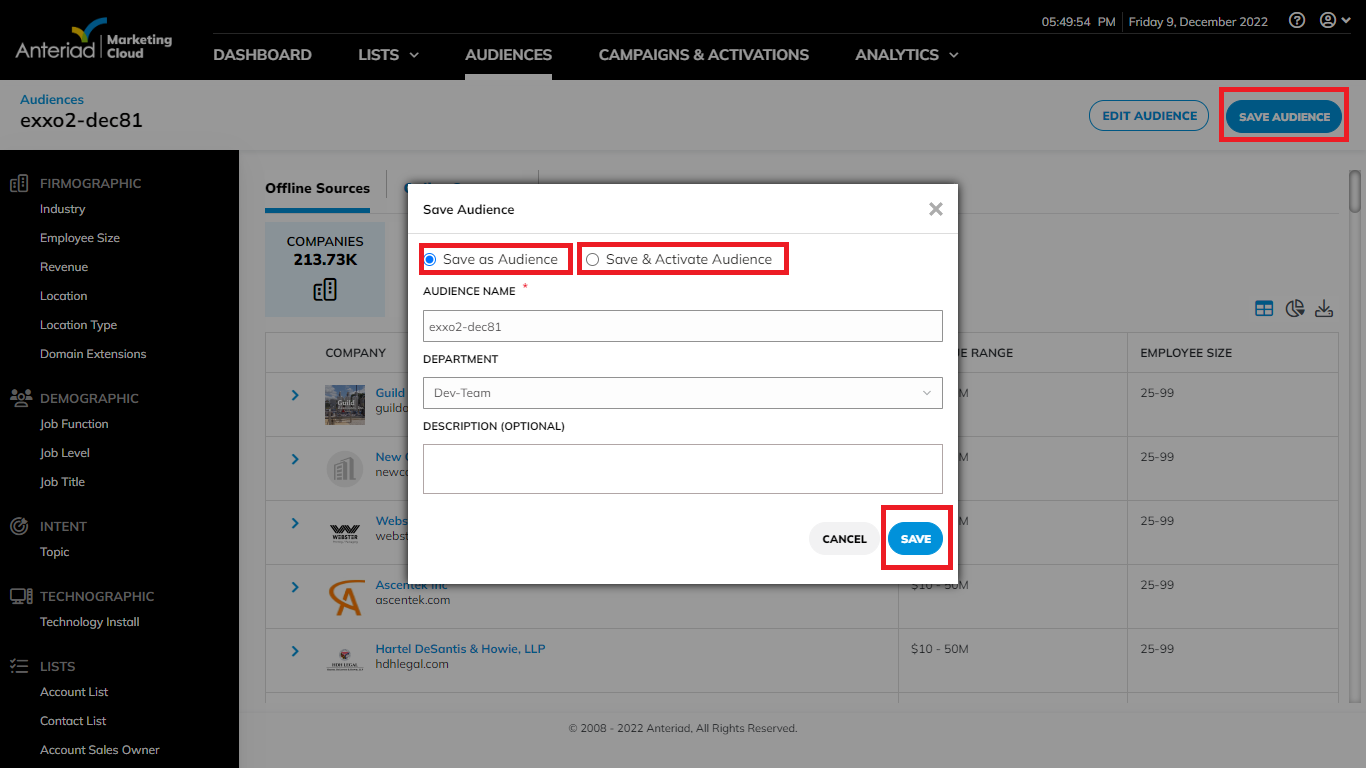
ii. To download, select the download icon to download the Audience data under each tab of Company, Domain and Contact- You can click the Edit Audience button to edit your Audience
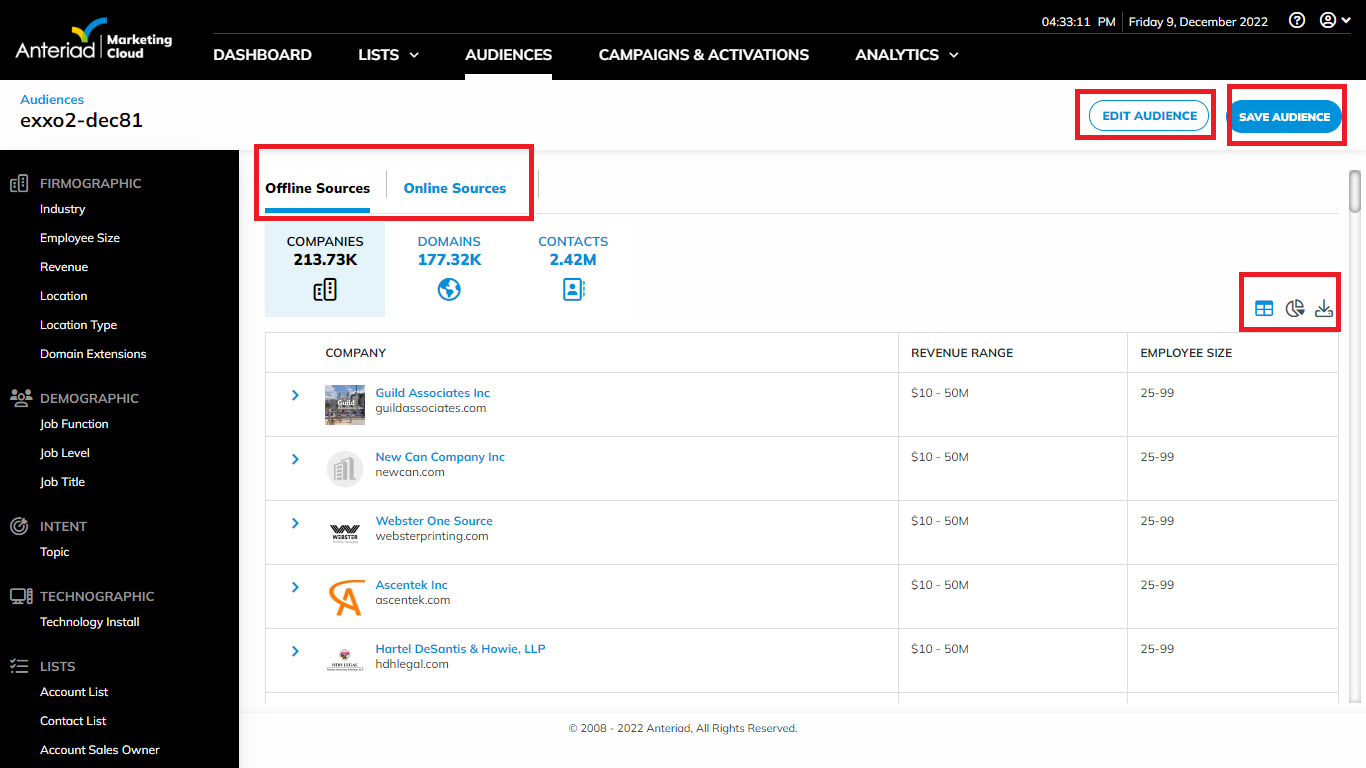
- Click on Save Audience to save the Audience
- The Save & Activate Audience now enables you to save the Audience and create campaign with the audience on the go. Before now, using this feature only enables you use the audience for that particular campaign without saving the Audience into the Audience Library. Currently, when you use this feature, your Audience is saved in the Audience library and you can access it when needed
4. Campaigns & Activations
4. Campaigns & Activations
An Audience can now be used to create multiple Campaigns and Activations. Each campaign can have only one instance of each activation type (e.g. an Audience can be used to create one PersonaBase campaign and one Displaybase Campaign, but not two DisplayBase campaigns.)
Audiences can now be activated on the following programmatic platforms via the Anteriad Marketing Cloud:
i. Facebook
ii. TradeDesk
iii. Liveramp
iv. Google DV 360
When an audience is activated on one of these platforms it is sent to the user's seat on that platform, and the user must then log into that platform to build and run a campaign using that Audience.
4.1 To Create Multiple Campaigns and Activations from an Audience:
4.1 To Create Multiple Campaigns and Activations from an Audience:
- Login to Anteriad Marketing Cloud
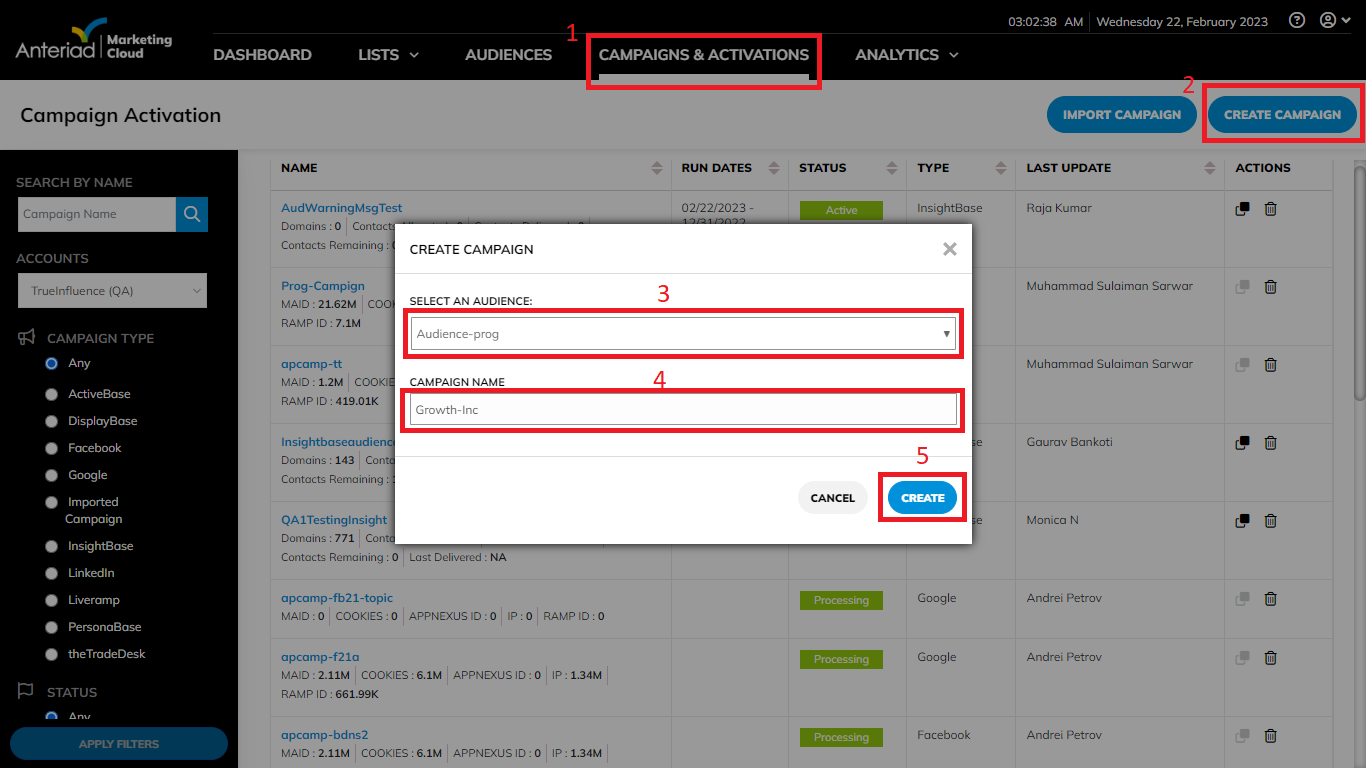
- Click Campaigns & Activations > Create Campaigns
- Select an Audience from the Audience list dropdown
- Enter the campaign name on the pop-up modal
- Click on Create. This will take you to a page where you will select the type(s) of Campaigns or Activations you want to create
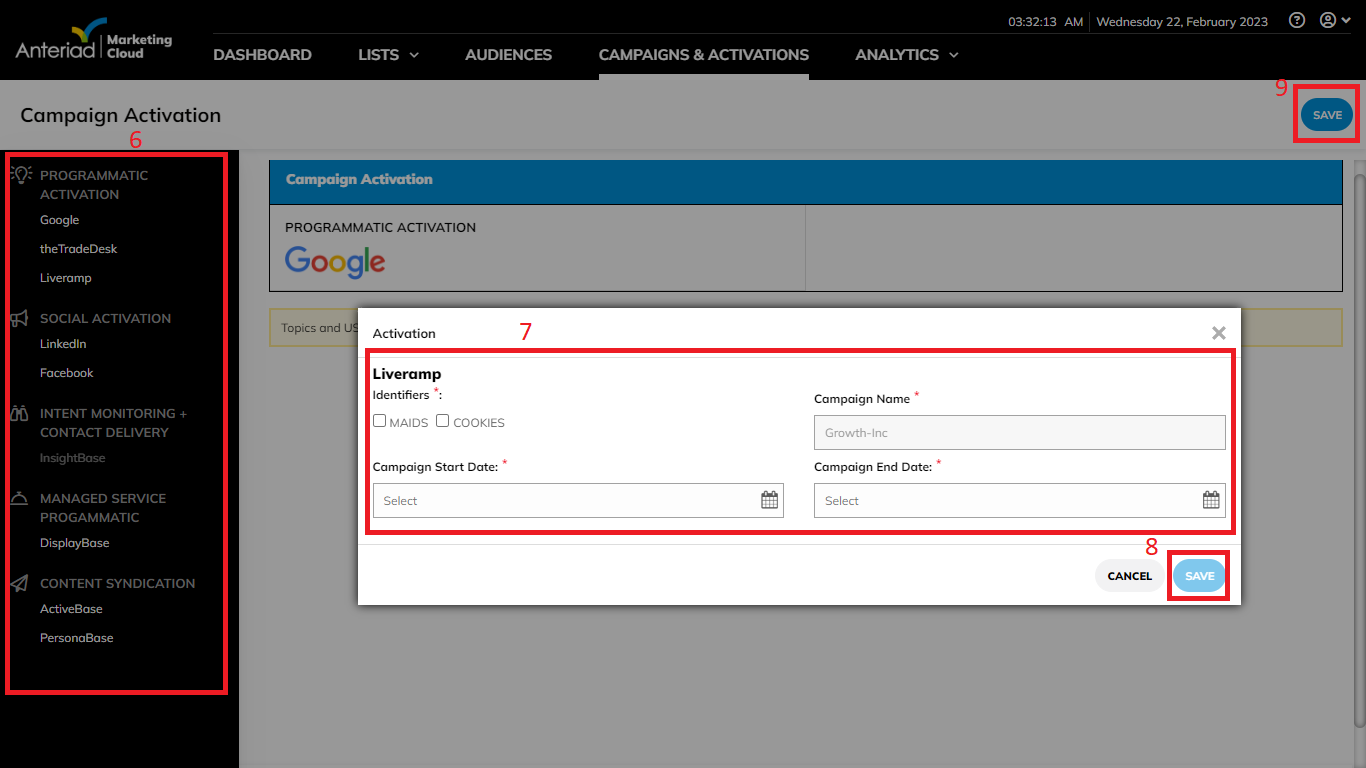
- Select the activation channel from any of the activation type(s) options on the left:
i. Programmatic activation
ii Social Activation
iii. Intent Monitoring + Contact Delivery
iv. Managed Service Programmatic
v. Content Syndication - Input all necessary requirements of the selected activation channel
- Click Save on the modal to save the activation
- When you have selected and inputted the necessary fields for all the desired campaign channels you'd want to activate, click the Save at the top right corner of the page to save your campaign
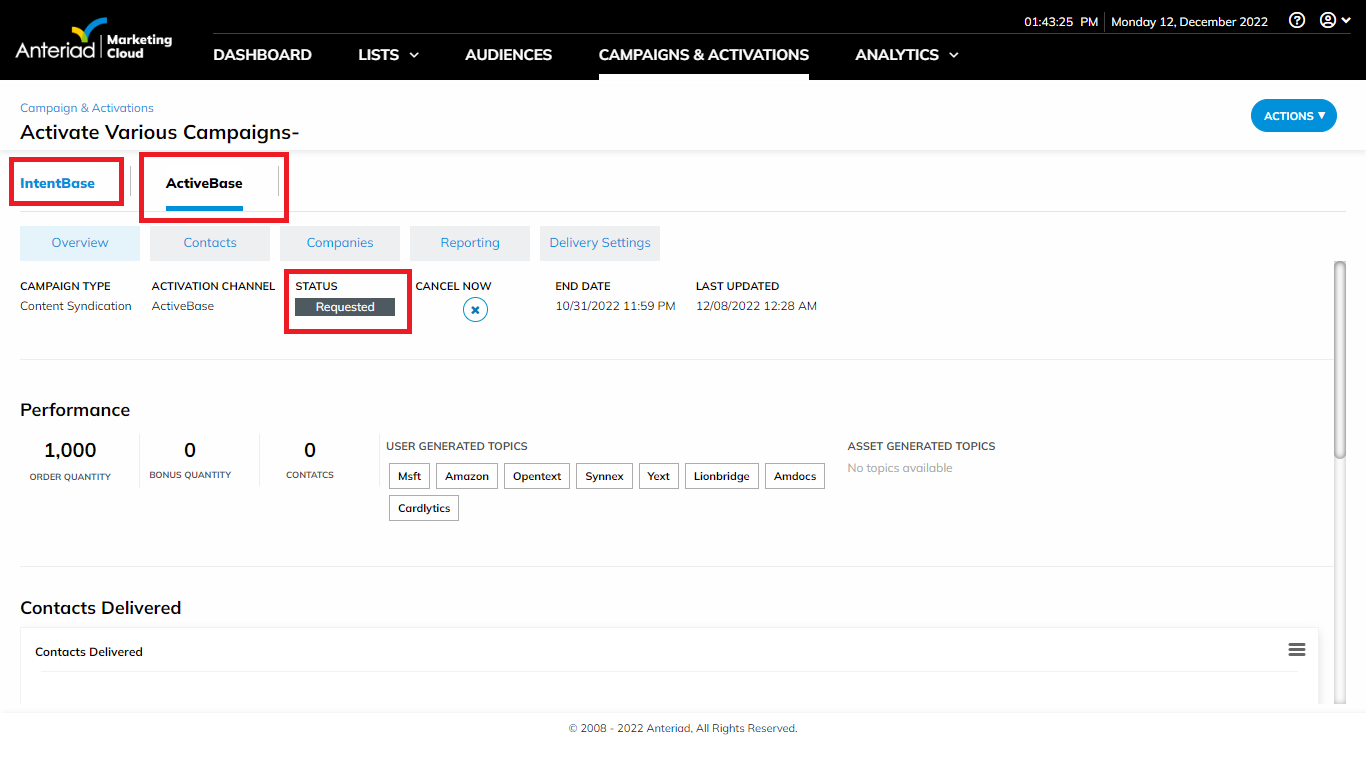
- After clicking Save, you will be taken to your Campaign object page
i. The default status of all your Activations type is Draft
ii. Click on each Campaign tab, and click on Activate to make the campaign active
4.2 Job Function reporting for Content Syndication campaigns:
4.2 Job Function reporting for Content Syndication campaigns:
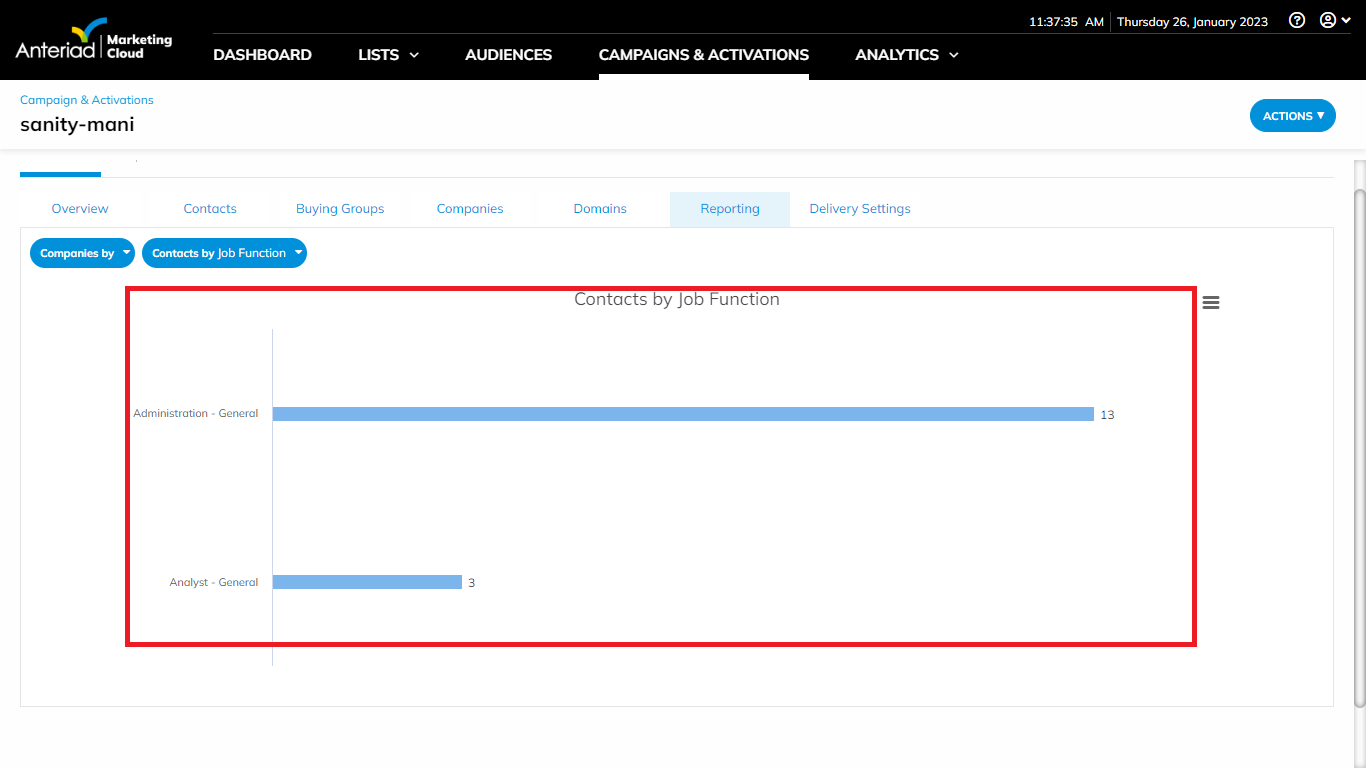
A chart showing Contacts breakdown by Job Function has been added for PersonaBase and ActiveBase campaigns.
To view this report:
- Login to Marketing Cloud
- Click Campaigns & Activations
- Select any of ActiveBase or PersonaBase campaigns
- Click the Report tab
- Select Contacts by Job Function from the drop-down to view contacts breakdown by job-function
5. New Topics Added to the Intent Topics Dictionary
5. New Topics Added to the Intent Topics Dictionary
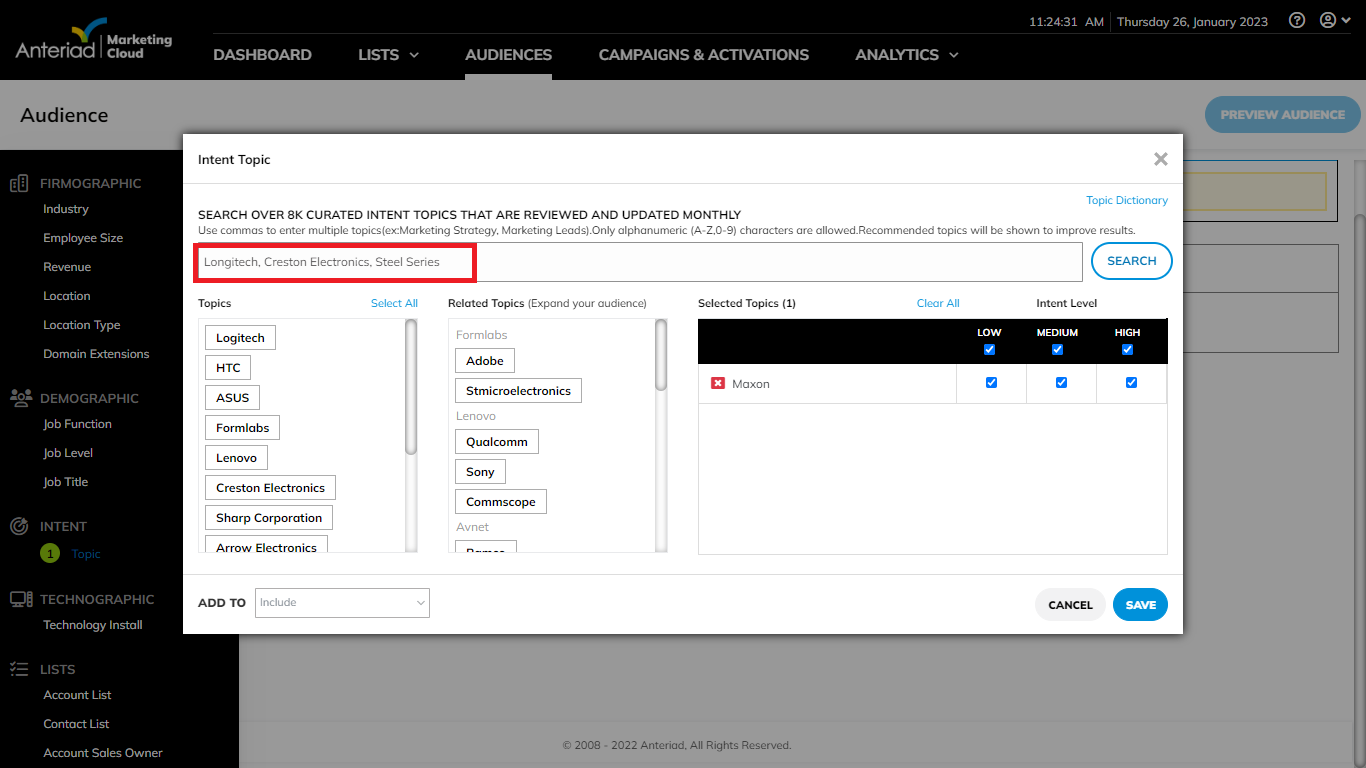
The following topics were added to the Intent Topic Dictionary.
- Logitech
- Creston Electronics
- Steel Series
A search of these topics in Anteriad Marketing Cloud now returns direct and related topics associated with them
6. User Login Experience Enhancement
6. User Login Experience Enhancement
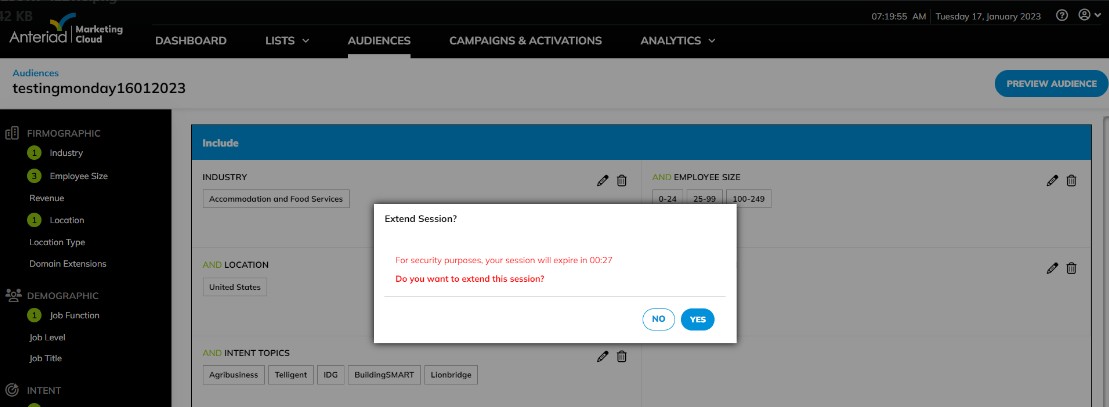
Users are now prompted to either extend their session or log out if their session is about to expire. The system redirects to the login page once a user is logged out after elapsed of the thirty (30) minutes threshold. Also, when the user re-login within two hours of account logout, the system redirects the user to the page where they were before the system logged them out. Before now, when a user is logged out, the user continues to see the page they were on in the platform and the system only redirects them to the login page when they try to carry out an activity in the platform.
6.1 To verify this:
6.1 To verify this:
- login into Marketing Cloud
- Stay inactive for about twenty-five (25) minutes
- Notice the system pops a message with a timer asking if you want to extend your session
- Selecting Yes extends your session
- Selecting No logs out of the system and takes you to the login page
- Not selecting any logs you out after a countdown of five (5) minutes
7. Consolidate contacts from multiple campaigns into a single Contacts report file
7. Consolidate contacts from multiple campaigns into a single Contacts report file
Users can now filter and download Contacts from multiple campaigns into a single Contacts file. Before now, the Contacts are downloaded in different campaign files in a zipped file. This eliminates the stress of accessing the contacts in different files.
7.1 To access the consolidated contacts report:
7.1 To access the consolidated contacts report:
- Login into Marketing Cloud
- Go to Analysis > Campaign Contacts
- Select the criteria for the contacts you want to download on the left-hand side and click on the filter button
- the system filters and returns Campaign with contacts that meet the criteria you chose on the right-hand side
- Check to select the campaigns you'd want to download their contacts from the list of campaign results returned in step 3 above
- Click on the Export button by the top-right to follow the prompt to download the file to your local
- Notice that the contacts from multiple campaigns are consolidated into one file
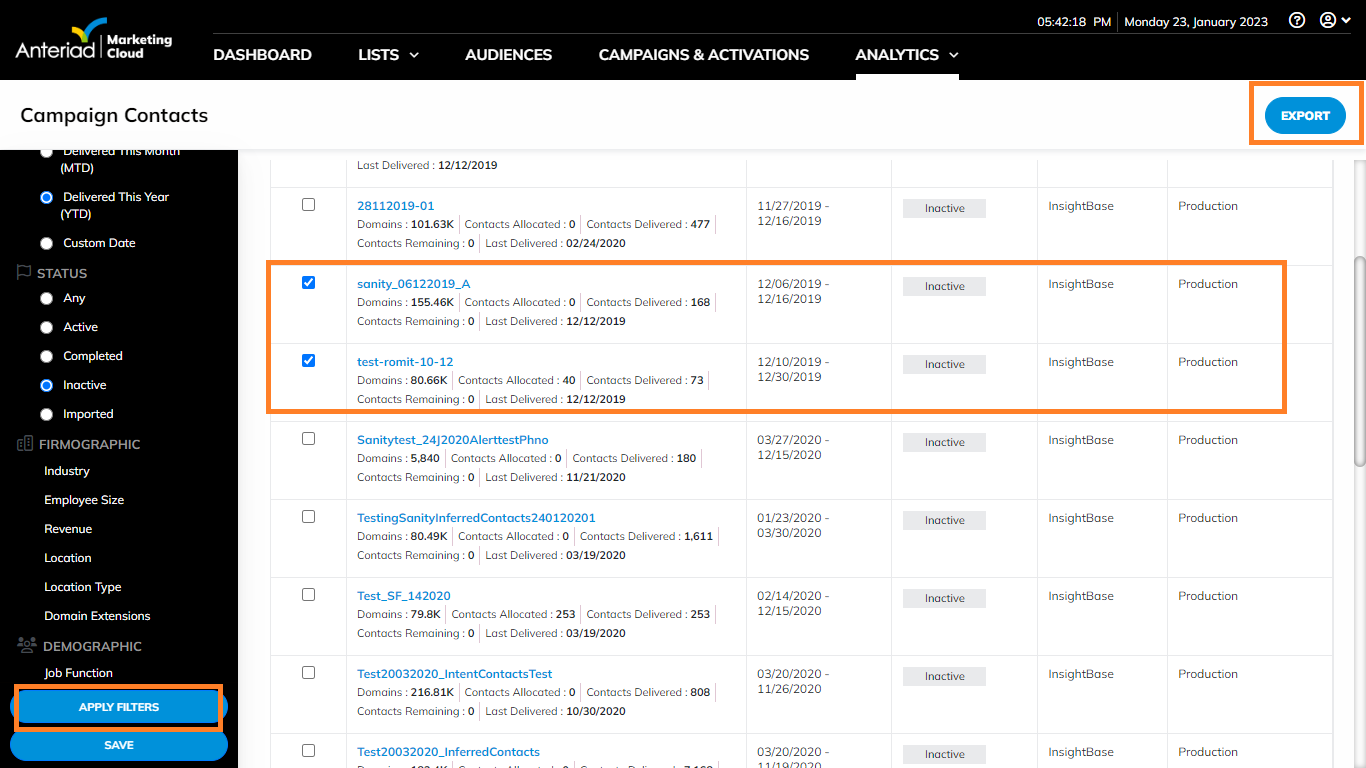
You will see below that contacts from the two campaigns were merged. The Campaign ID and Campaign Name were recorded against each record to show the campaign each contact was delivered from

8. Allow dash (-) and underscore (_) in user email addresses in AMC
8. Allow dash (-) and underscore (_) in user email addresses in AMC
You can now register accounts with emails with special characters dash (-) and underscore (_) in AMC. Before now, the platform does not accept any special characters in user emails, with this update, users with emails containing special characters can now be onboarded in the platform

9. Change Platform URL to app.anteriad.com
9. Change Platform URL to app.anteriad.com
The Anteriad Marketing Cloud can now be accessed using app.anteriad.com. Using the old URL, app.trueinfluence.com will redirect you to app.anteriad.com. Use same login to access your account. Nothing changed, just the URL 😃
10. Data Updates
10. Data Updates
1.Intent History: Intent topic history will start fresh with the 2023.2.0 release of the Anteriad Marketing Cloud. This will impact the following areas of the platform:
a. InsightBase Campaign > Overview > Companies Spiking chart: This chart will be populated with one week of data when the AMC 2023.2.0 is released. Each week the chart will populate with an additional week of data until a 90 day lookback is shown. This will be reflected in the CSV downloads available from this chart as well.
b. InsightBase Campaign > Companies > Download: Companies shown in the Companies tab will be from the last 7 days and will build to 90 days in the 90 days following the release. When companies are downloaded only 7 days of data will be available. At 30 days following the release 30 days will be available for download, 60 days following the release 60 days will be available, 90 days following the release 90 days will be available.
c. InsightBase Campaign > Domains > Download: Only a 7 day download will be available following the release. 30, 60, and 90 day downloads will be available as historical intent data builds at respective interbals following the release.
2. DUNS Removal: Marketing Cloud no longer supports the upload, processing, or use of DUNS list in the platform
Updated 8 months ago
